Tabレイアウトを利用するためには、TabHostとTabWidgetを利用します。
TabHostはレイアウトのルートノードになります。
TabHost配下には、TabWidgetやFrameLayoutを配置できます。
タブは以下の2つの方法で実現可能です。
- 同一アクティビティ内でViewを切り替える
- 異なるアクティビティを切り替える
TabLayoutの使い方サンプル
「HelloGridView」という名前のAndroidプロジェクトを作成します。
新規クラスで「ArtistsActivity」「AlbumsActivity」「SongsActivity」という3つのアクティビティを作成します。
(3つのアクティビティは各タブに割り当てられます)3つのアクティビティを以下の例のように作成します。アンドロイドマニフェストファイル「AndroidManifest.xml」を開き、アプリケーションタブをクリックします。
タブを切り替えるためのアイコンを準備します。
「res/layout/main.xml」ファイルを開き、以下のように修正します。
メインのアクティビティクラス「HelloTabWidgetActivity.java」ファイルを作成します。
「HelloTabWidgetActivity.java」ファイルを以下のように修正します。
アンドロイドマニフェストファイルの「HelloTabWidgetActivity」アクティビティ部分をを以下のように修正します。
Androidアプリケーションを実行してみましょう。
「ArtistsActivity.java」
public class ArtistsActivity extends Activity {
public void onCreate(Bundle savedInstanceState) {
super.onCreate(savedInstanceState);TextView textview = new TextView(this);
textview.setText("This is the Artists tab");
setContentView(textview);
}
}
「AlbumsActivity.java」
public class AlbumsActivity extends Activity {
public void onCreate(Bundle savedInstanceState) {
super.onCreate(savedInstanceState);TextView textview = new TextView(this);
textview.setText("This is the Albums tab");
setContentView(textview);
}
}
「SongsActivity.java」
public class SongsActivity extends Activity {
public void onCreate(Bundle savedInstanceState) {
super.onCreate(savedInstanceState);TextView textview = new TextView(this);
textview.setText("This is the Songs tab");
setContentView(textview);
}
}
「Application Nodes」で「追加」ボタンを押し、「Activity」を選択して「OK」ボタンをクリックします。
「Attributes for Activity」の「Name*」欄の「参照」ボタンを押し、先ほど作成したアクティビティクラスを選択します。
(「ArtistsActivity」「AlbumsActivity」「SongsActivity」について行います。)
以下のアイコンをダウンロードしてください。


ダウンロードしたアイコンを「res/drawable/」ディレクトリにコピーします。
「res/drawable/」ディレクトリ配下に、「ic_tab_artists.xml」というファイルを新規作成し、以下のように修正します。
<?xml version="1.0" encoding="utf-8"?><selector xmlns:android="http://schemas.android.com/apk/res/android">
    <!-- When selected, use grey -->
    <item android:drawable="@drawable/ic_tab_artists_grey"
          android:state_selected="true" />
    <!-- When not selected, use white-->
    <item android:drawable="@drawable/ic_tab_artists_white" />
</selector>
(「ic_tab_albums.xml」「ic_tab_songs.xml」についても同様に作成します。)
<?xml version="1.0" encoding="utf-8"?><TabHost xmlns:android="http://schemas.android.com/apk/res/android"
    android:id="@android:id/tabhost"
    android:layout_width="fill_parent"
    android:layout_height="fill_parent">
    <LinearLayout
        android:orientation="vertical"
        android:layout_width="fill_parent"
        android:layout_height="fill_parent"
        android:padding="5dp">
        <TabWidget
            android:id="@android:id/tabs"
            android:layout_width="fill_parent"
            android:layout_height="wrap_content" />
        <FrameLayout
            android:id="@android:id/tabcontent"
            android:layout_width="fill_parent"
            android:layout_height="fill_parent"
            android:padding="5dp" />
    </LinearLayout>
</TabHost>
TabHostはTabWidgetとFrameLayoutを垂直に配置するためにLinearLayoutを利用しています。
(※)TabWidgetとFrameLayoutの「tabs」「tabcontent」というIDはTabHostが利用するIDであるため、このID以外の名称を付与してはいけません。
「HelloTabWidgetActivity.java」は「TabActivity」クラスを継承するように作成します。
public class HelloTabWidget extends TabActivity {
public void onCreate(Bundle savedInstanceState) {    super.onCreate(savedInstanceState);
    setContentView(R.layout.main);    Resources res = getResources(); // Resource object to get Drawables
    TabHost tabHost = getTabHost();  // The activity TabHost
    TabHost.TabSpec spec;  // Resusable TabSpec for each tab
    Intent intent;  // Reusable Intent for each tab    // Create an Intent to launch an Activity for the tab (to be reused)
    intent = new Intent().setClass(this, ArtistsActivity.class);    // Initialize a TabSpec for each tab and add it to the TabHost
    spec = tabHost.newTabSpec("artists").setIndicator("Artists",
                      res.getDrawable(R.drawable.ic_tab_artists))
                  .setContent(intent);
    tabHost.addTab(spec);    // Do the same for the other tabs
    intent = new Intent().setClass(this, AlbumsActivity.class);
    spec = tabHost.newTabSpec("albums").setIndicator("Albums",
                      res.getDrawable(R.drawable.ic_tab_albums))
                  .setContent(intent);
    tabHost.addTab(spec);    intent = new Intent().setClass(this, SongsActivity.class);
    spec = tabHost.newTabSpec("songs").setIndicator("Songs",
                      res.getDrawable(R.drawable.ic_tab_songs))
                  .setContent(intent);
    tabHost.addTab(spec);    tabHost.setCurrentTab(2);
}
<activity android:name="HelloTabWidgetActivity"android:label="@string/app_name"
android:theme="@android:style/Theme.NoTitleBar">
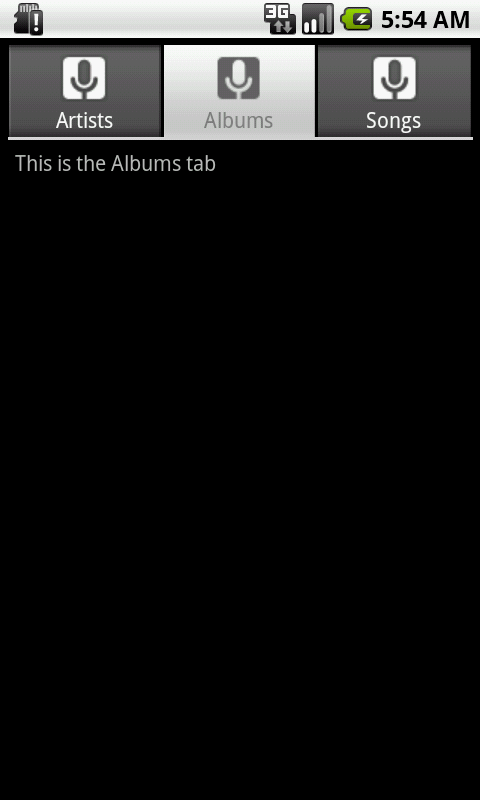
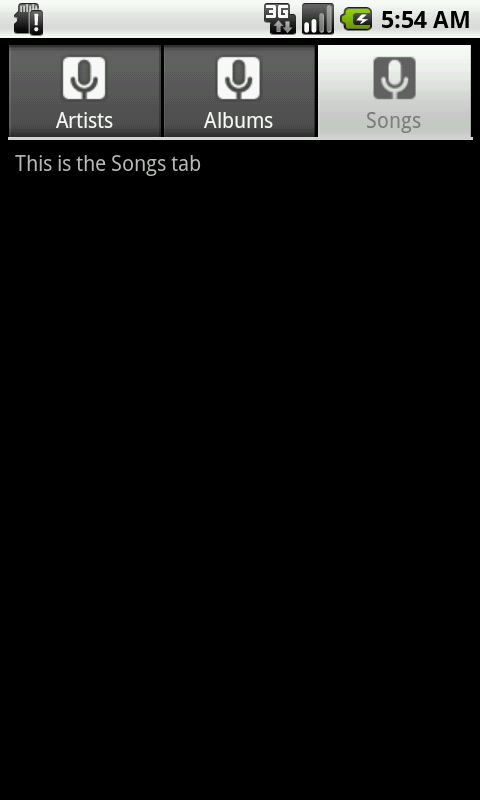
以下のように表示されれば成功です。

アイコンをクリックするとタブが切り替わります。