RealativeLayoutクラスは、ViewGroupクラスを継承したものであり、子ビューを相対的な位置に配置するものです。
ビューの位置は、例えば、~の左・~の下と定義したり、縦方向中心の左と定義したりすることができます。
RelativeLayoutはユーザインタフェースを設計する際に非常に有用です。
(ViewGroupクラスを入れ子で定義する必要が無くなるので。)
LinearLayoutをネスト構造で利用しようとしている場合、このRelativeLayoutを活用できると思います。
RelativeLayoutの使い方サンプル
「HelloRelativeLayout」という名前のAndroidプロジェクトを作成します。
「res/layout/main.xml」ファイルを開き、以下のように修正します。
Javaソースを開き、以下のようにonCreate()メソッドでレイアウトファイル(res/layout/main.xml)がロードされるように修正します。(Eclipseで自動生成されたJavaソースは既にそのようになっています。)
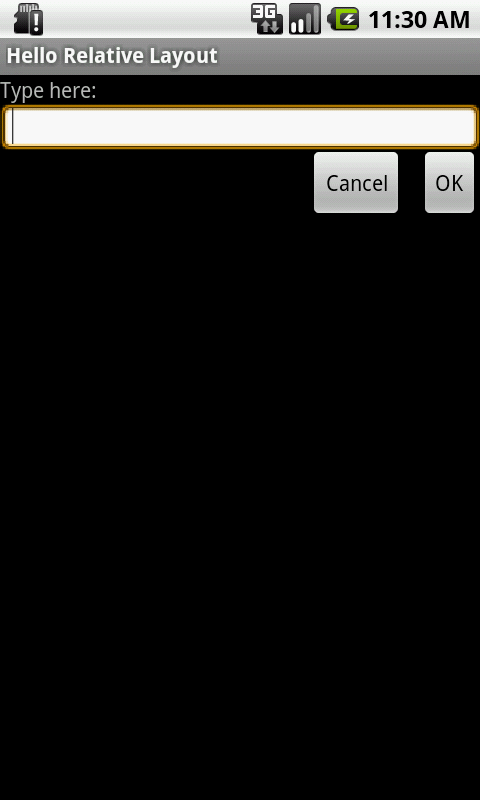
Androidアプリケーションを実行してみましょう。
<?xml version="1.0" encoding="utf-8"?><RelativeLayout xmlns:android="http://schemas.android.com/apk/res/android"
    android:layout_width="fill_parent"
    android:layout_height="fill_parent">
    <TextView
        android:id="@+id/label"
        android:layout_width="fill_parent"
        android:layout_height="wrap_content"
        android:text="Type here:"/>
    <EditText
        android:id="@+id/entry"
        android:layout_width="fill_parent"
        android:layout_height="wrap_content"
        android:background="@android:drawable/editbox_background"
        android:layout_below="@id/label"/>
    <Button
        android:id="@+id/ok"
        android:layout_width="wrap_content"
        android:layout_height="wrap_content"
        android:layout_below="@id/entry"
        android:layout_alignParentRight="true"
        android:layout_marginLeft="10dip"
        android:text="OK" />
    <Button
        android:layout_width="wrap_content"
        android:layout_height="wrap_content"
        android:layout_toLeftOf="@id/ok"
        android:layout_alignTop="@id/ok"
        android:text="Cancel" />
</RelativeLayout>
上記のXMLファイルでは、「layout_below」「layout_alignParentRight」「layout_toLeftOf」のような属性が定義されています。
RelativeLayoutを利用すると、これらの属性を利用して、各ビューをどのように配置したいのかを定義することができます。
いくつかの属性では、リソースIDを利用してビューを指定し、そのビューに対する位置関係を定義しています。
例えば、最後に定義された「Button」では、「ok」というIDの左(android:layout_toLeftOf)で、かつ、上端を揃えた(android:layout_alignTop)位置に配置されます。
すべてのレイアウト属性については、以下で定義されています。
| レイアウト属性: | RelativeLayout.LayoutParams |
public void onCreate(Bundle savedInstanceState) {    super.onCreate(savedInstanceState);
    setContentView(R.layout.main);
}
setContentView(int)メソッドは、Activityクラスで指定されたIDのレイアウトファイルを読み込みます。
「R.layout.main」を指定すると、リソースファイルの「res/layout/main.xml」が指定されることになります。
以下のように表示されれば成功です。